• FAQ
    • Plan & Payments
    • Using eformsign
    • Others
  • USER GUIDE
  • API DOCUMENTATION
    • Implementation Guide
    • Open API
    • Webhook
  • CONTACT
  • BACK TO MAIN SITE
  • FAQ
    • Plan & Payments
    • Using eformsign
    • Others
  • USER GUIDE
  • API DOCUMENTATION
    • Implementation Guide
    • Open API
    • Webhook
  • CONTACT
  • BACK TO MAIN SITE
home/Knowledge Base/Form Builder (OZ in Office)
Popular Search:eSignature, form builder, workflow

Using Components: Datetime

Example of using the Datetime component

What is it used for?

This component is used for entering a date. Clicking the component displays a date selection window where you can select the desired date.

Component Properties
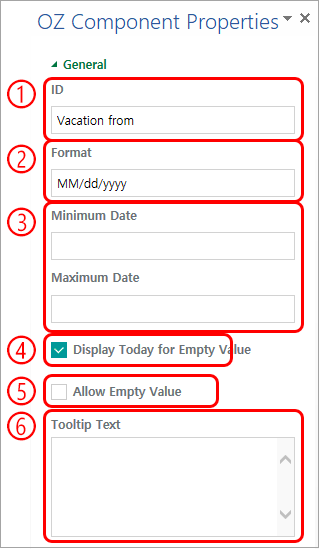
① ID

Enters the ID of the Datetime component (e.g. the ID of the component for selecting the vacation start date can be named ‘vacationStartDate’.

② Format

Sets the format in which date is displayed.

  • yyyy: Year
  • MM: Month (must be in uppercase)
  • dd: Day


For example, if you want to display the date in the format of ‘2020-02-05’, then enter yyyy-MM-dd in the Format field.

③ Minimum Date/Maximum Date

Sets the range of dates that can be selected in the component by specifying the minimum and maximum dates.

④ Display Today for Empty Value

Checking this option automatically enters the date (the date in which the document is opened) when the document is opened. This option is checked by default when you add a Datetime component. You can change the date by clicking the component.

⑤ Allow Empty Value

Checking this option allows you to clear the number displayed on the numeric component. In a Datetime component, once you select a date, you can change it to another date but cannot clear the date. Checking this option allows you to clear the date displayed on the Datetime component.

However, if no date is selected in the Datetime component but the ‘Display Today for Empty Value’ option is checked, then the date component is automatically filled in with the date in which the document is opened. Below describes how to use this option.

  • PC: Right-click on the component to display the pop-up menu and then select the ‘Initialize Input Data’ menu.
  • Mobile: Click the trash can icon.

⑥ Tooltip Text

Displays the description in the tooltip text when you hover the mouse over an input field.

Was this helpful?

Yes  No
Form Builder (OZ in Office)
  • Using Components: Datetime
  • Hiding sheets/sections of a document when sending
  • Using Components: Document
  • Using Components: Date
  • Using Components: User
  • User Components: Attachment
View All 18  
Popular Articles
  • Generating and viewing a document number
  • How to auto-fill signed date in the e-contract
  • Video: How to create a template using eformsign form builder
  • Delegating Admin Role
  • Setting Document Naming Rule
KB Categories
  • Access Management
  • Account Settings
  • Autofill
  • Company Management
  • Document Management
  • eSignature
  • Form Builder (OZ in Office
  • Mass Creation
  • Plan & Payments
  • Template Settings
  • Troubleshooting
  • Video Manuals
Language
  • Korean(한국어)
  • Japanese(日本語)
Features
  • Form Builder
  • eSignature
  • Workflow
  • Autofill
  • Mass Creation
  • Access Management
  • Notification Settings
  • Document Archive
  • Data Management
  • Timestamp & Audit Trail
  • API
Use Cases
  • eContracts & eAgreements
  • Application & Request Form
How To Use
  • How To Use
  • eformsign Userguide
  • Form Builder Userguide
Pricing
  • Pricing
Blog
  • eformsign Blog
Download
  • eformsign Form Builder
  • Google Play
  • iTunes Appstore
  • Terms of Use
  • Terms of Use (Non-member)
  • Privacy Policy